|
Cable companies are out of control! I know many people with high cable bills ranging from $100-$300 or more! INSANE! There are a few things you can do to try and lower your monthly cable bill. Option 1. Get rid of your extra cable boxes! That's right! You don't need to have a bulky cable box in every room with a tv. Send it back! I save $45 a month on my cable bill by sending my cable boxes back (I kept the main receiver in my living room). I still watch cable in those rooms! How?! Well, I got a fire stick for each room and downloaded the DirectTV app on each one. I just insert my password and we watch all of our shows! This is the best time of year to buy a fire stick because of the holidays! Here's a link where you can find the best deal from Amazon! Option 2. Call your provider to negotiate your contract. The only reason I signed up with DirectTV is because they were advertising Sunday NFL Ticket free for one year with new contract. Since this costs over $300, I figured it sounded like a good deal, besides no other cable provider offers this service. My husband is a Raider's fan, and he has a Fantasy Football League, so we need to watch all the games! When my contract was about to be up, I called to have the service cancelled because we did not want to pay the high fees after the introductory rate was over. They renegotiated my contract with me, gave me a lower rate, and offered me another year of free Sunday NFL Ticket. The woman I spoke to told me that I should call back every year to renegotiate my contract to keep getting this free service! I think I will! There are so many companies competing for your business. Use this to your advantage! Option 3. Bundle your services when you can. I don't have internet through my DirectTV provider because it's not available in my area, so we use Comcast (which is also the fastest internet provider). However, I have AT&T cell phone services, which are partnered with Direct TV, so I combine my bills for a discount of about $5 a month, plus, I get free HBO channels. I really hope this helps you to save some dough! I should add that this post is not sponsored by the companies listed above. These thoughts, experiences, and opinions are my own. They are not guaranteed. This is just what has worked for me, and I'm hoping it can be helpful and useful to you too! If you have any questions, feel free to contact me!
0 Comments
STOP! Don't throw that out! Don't paint over it! Don't reupholster it! There is hope! Here are the following stains that I have gotten rid of: chalk marker on stained wood finish pen/pencil/hilighter on the wall permanent marker on cloth ink on my favorite upholstered bench red beet stain from my countertop Look what my daughter did! Why are toddlers little jerks?! 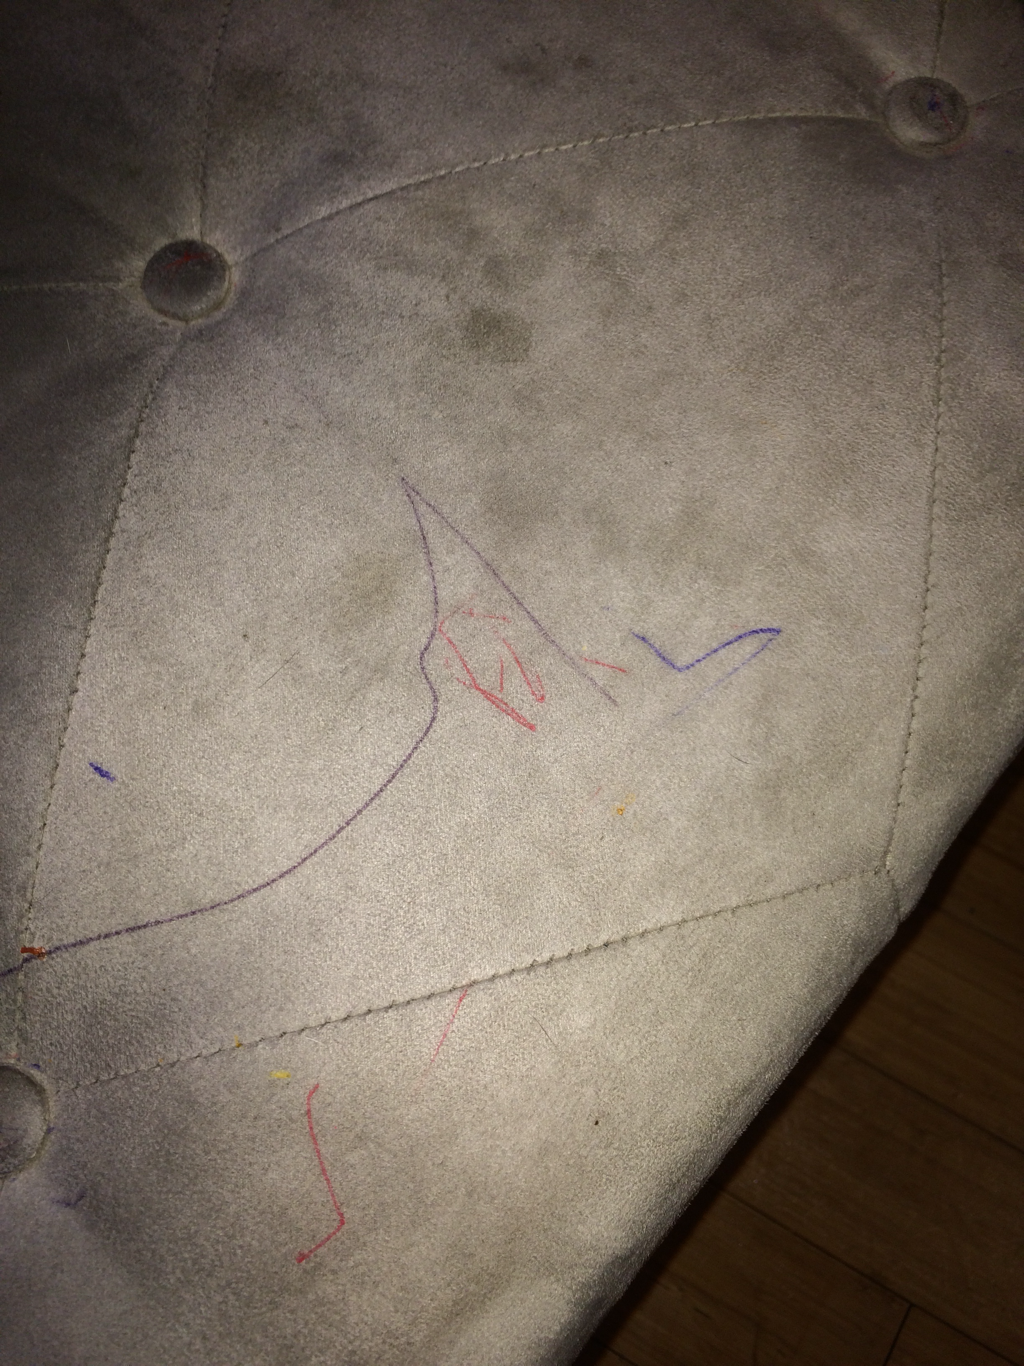 My entire bench was covered! I couldn't keep trying to cover it with a blanket. I thought about reupholstering it, but let's be real...when was I going to have the time for that?! I found this awesome product that got rid of my stain within a matter of minutes... check out the process! First, I sprayed the stained area, let it sit for 60 seconds, and got to scrubbing. I wiped everything with a damp cloth when I was finished. 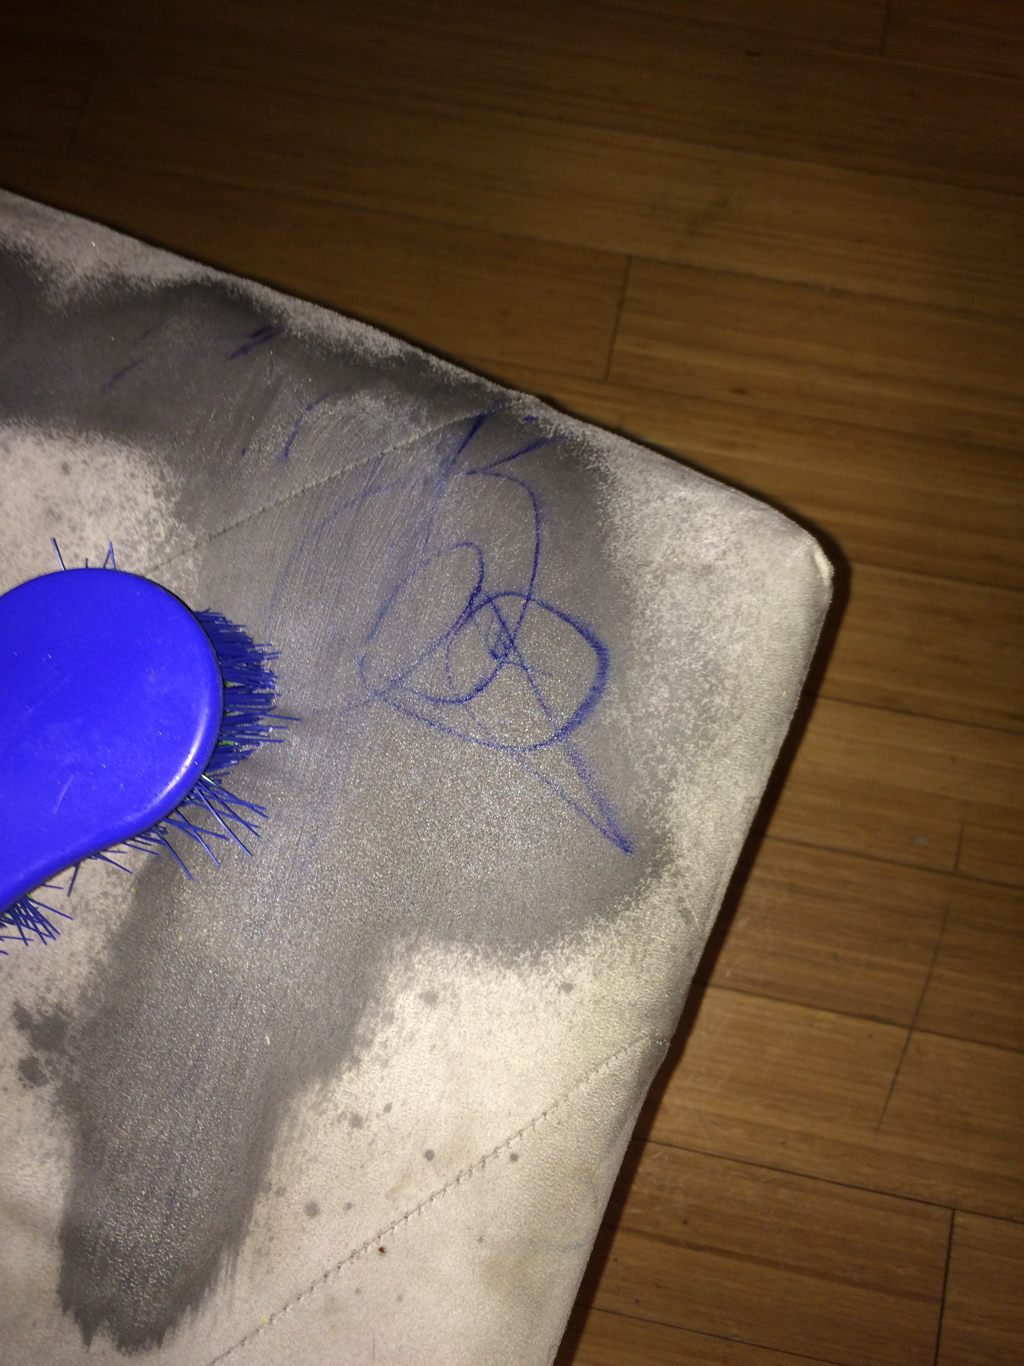 Going..... 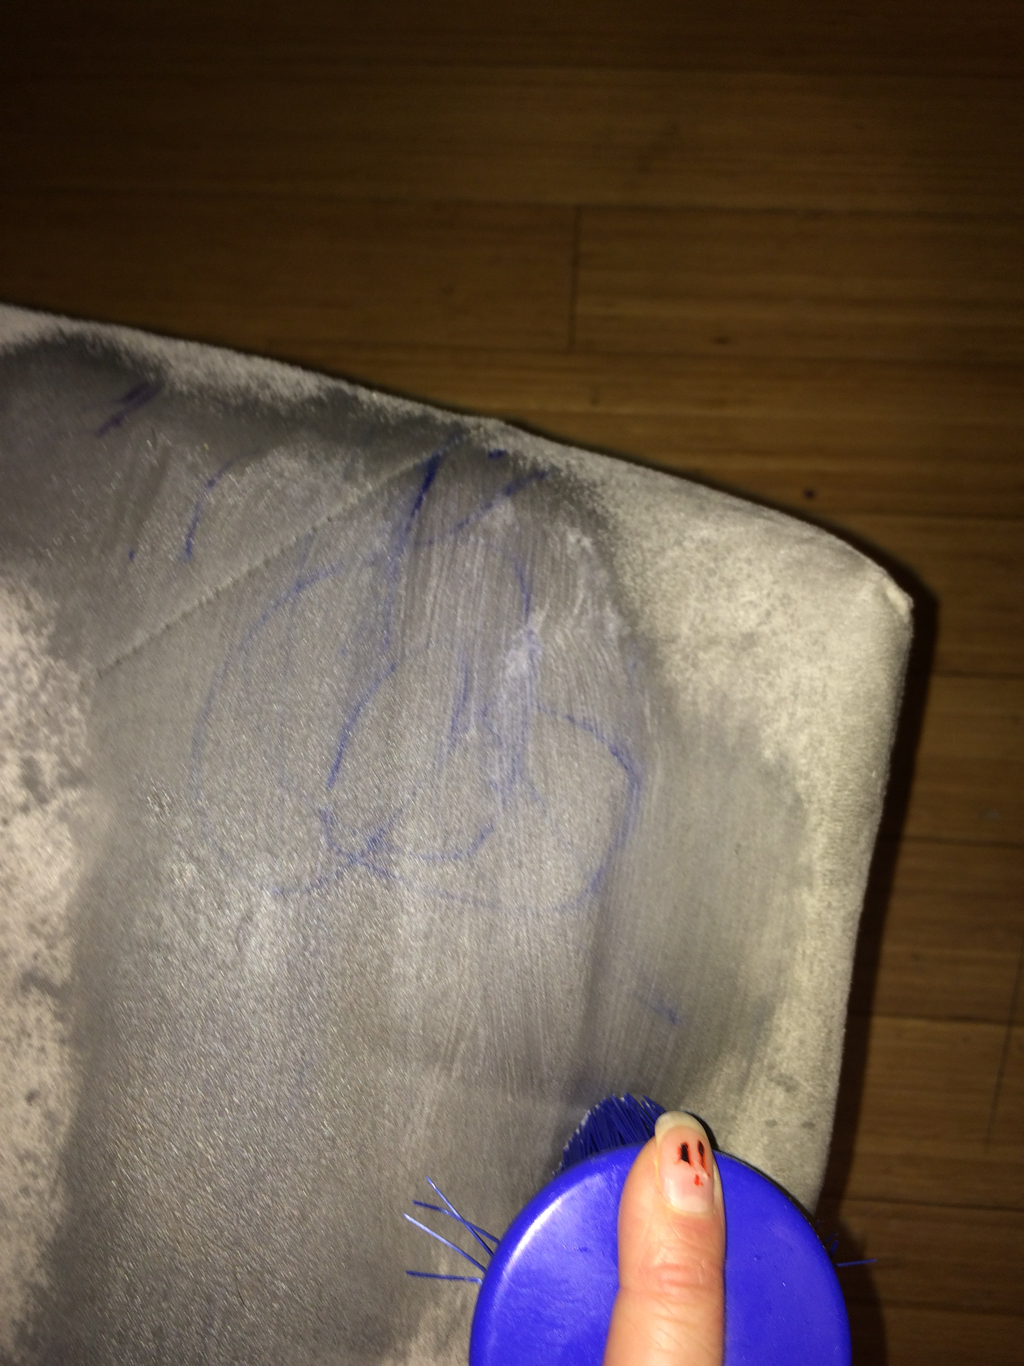 Going..... 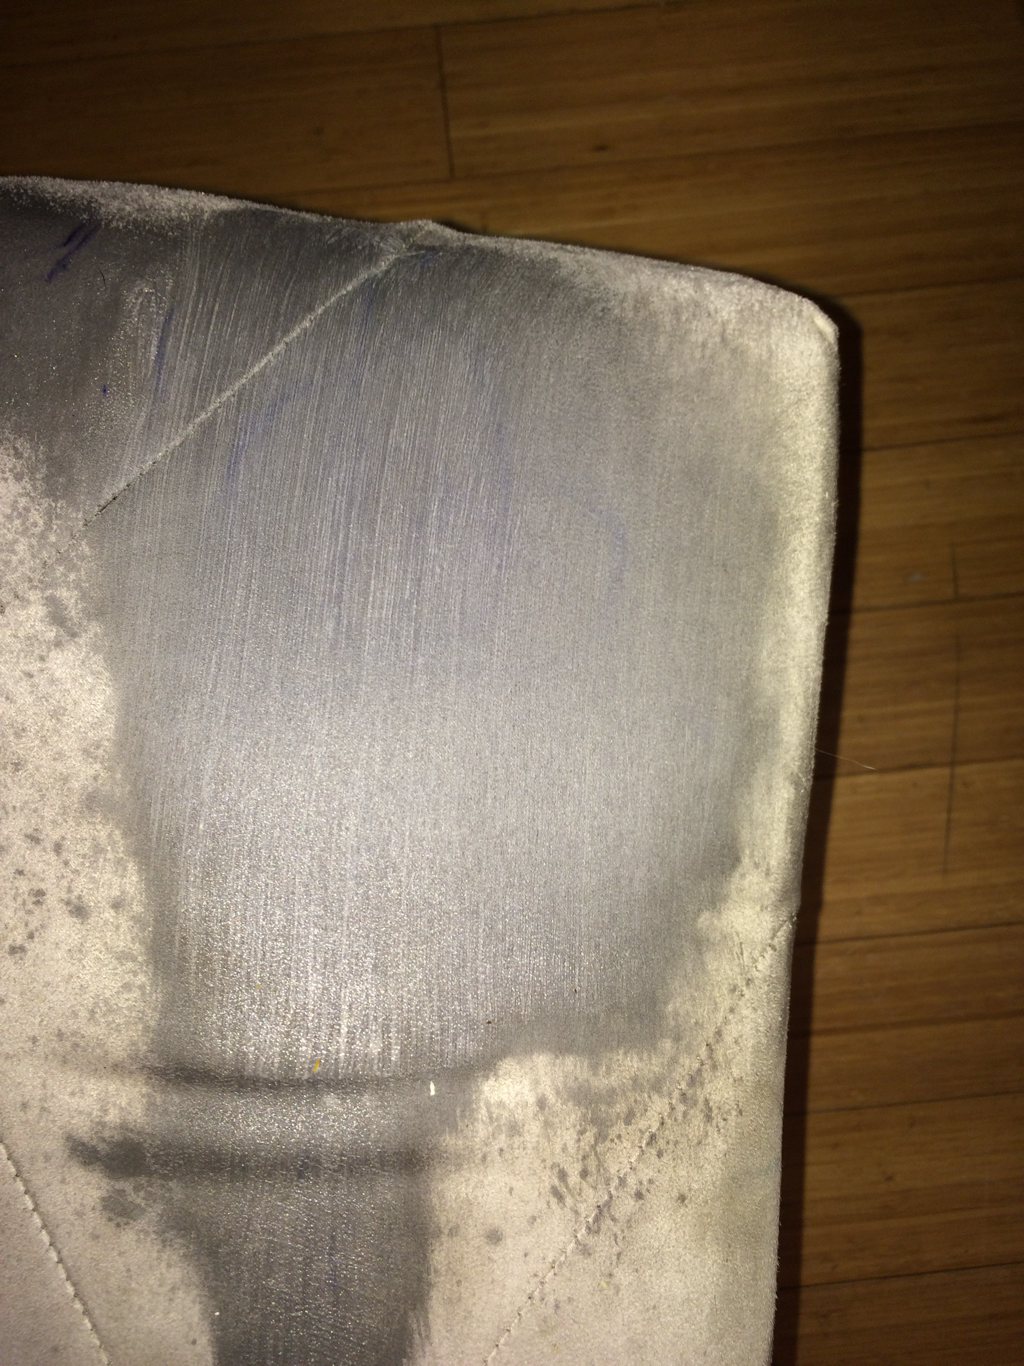 ....almost gone.... 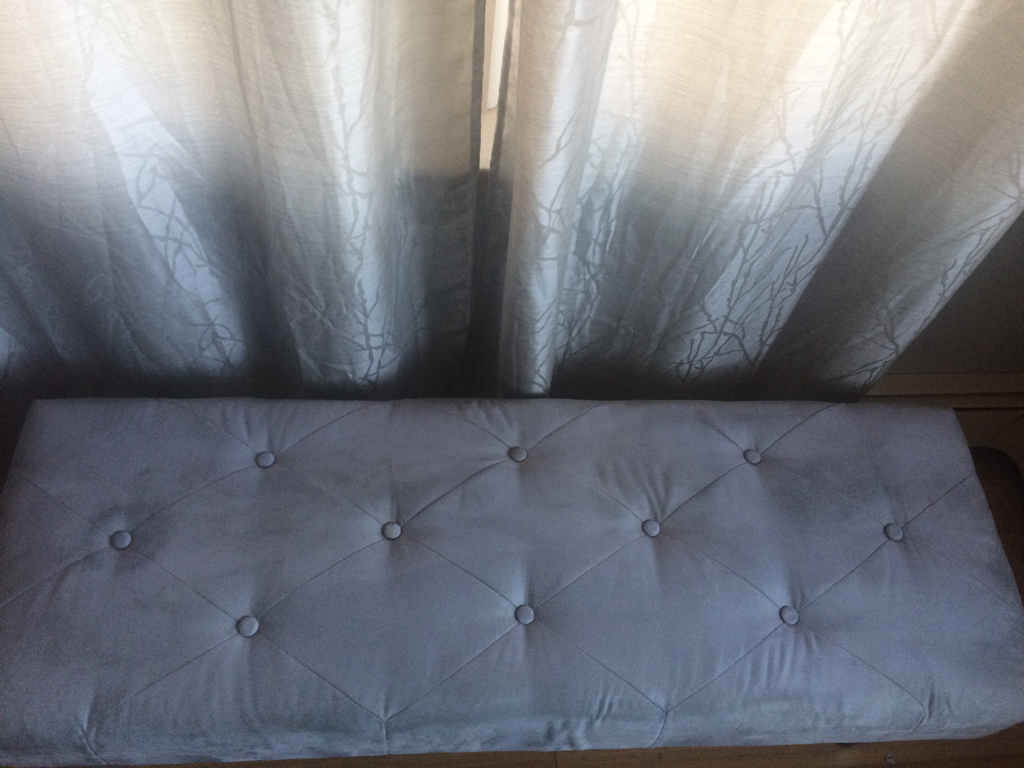 GONE!!!! AMAZING! It seriously took 5 minutes of work, and a few hours of waiting for it to dry! Easy peasy! Of course I had to test this out on permanent marker. This is my results with one application. I'd suggest giving it another go, but the results are surprising. 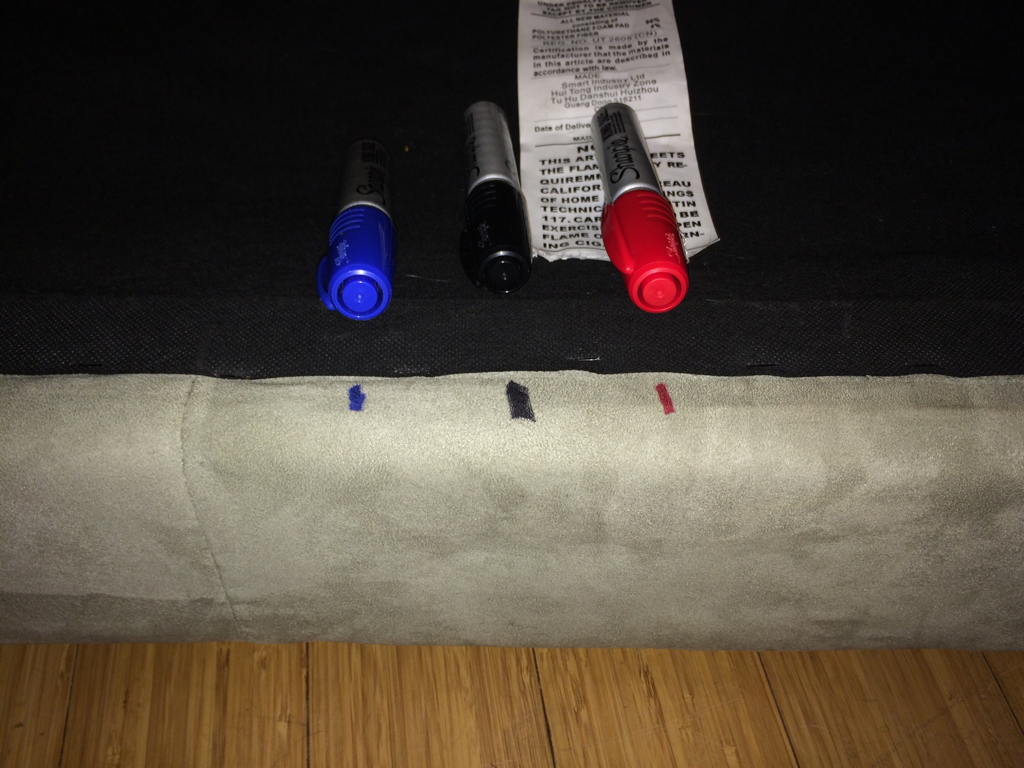 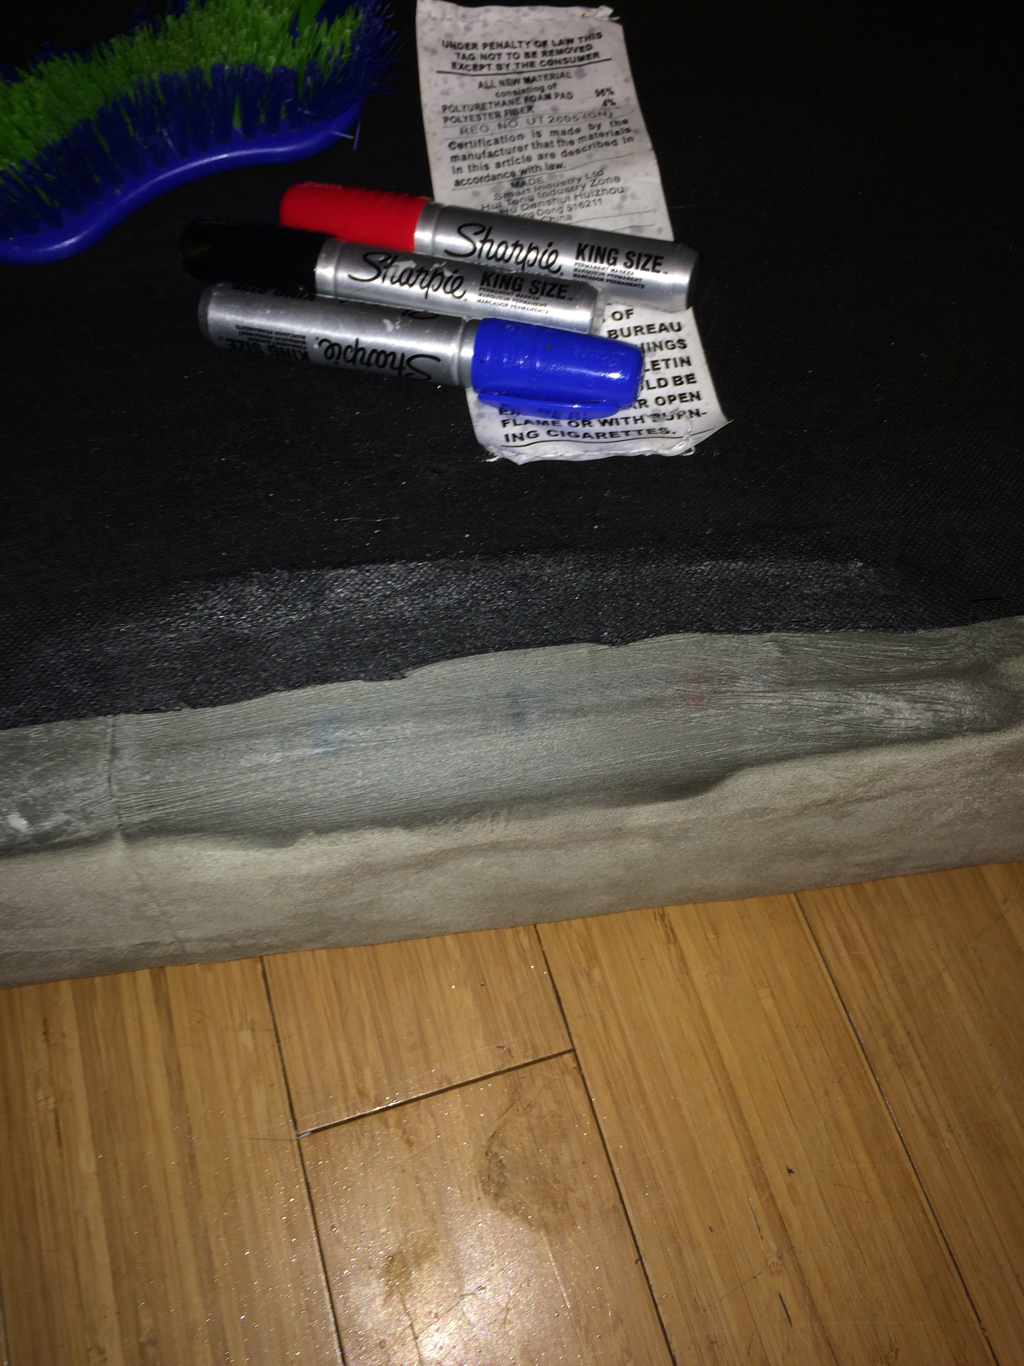 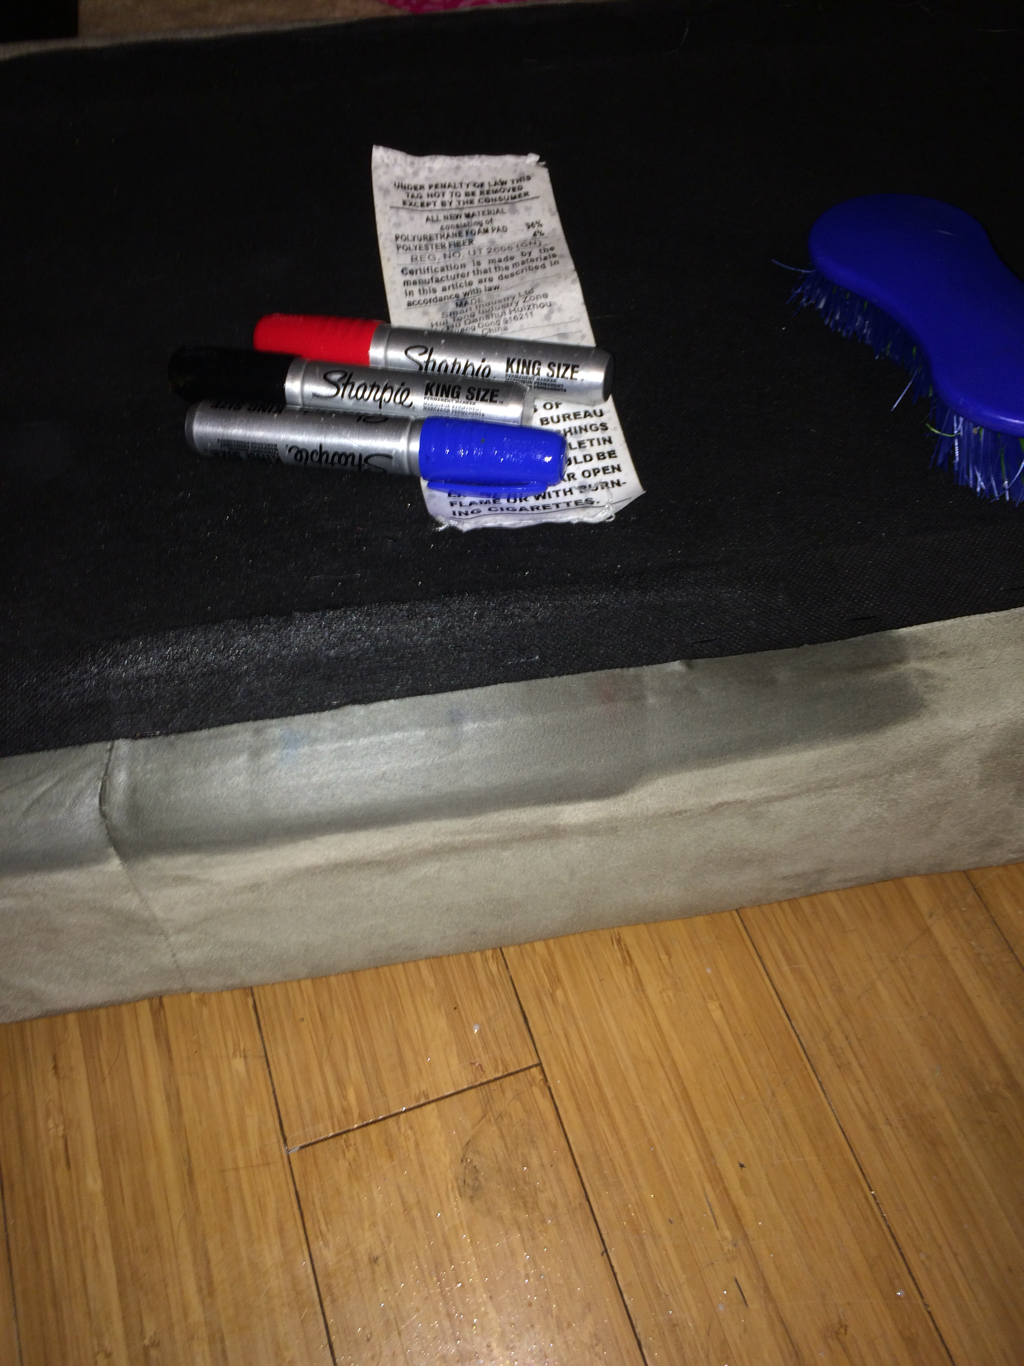 So, what is this Miracle Product?Try Amazon Prime for Free! Free two-day shipping is my favorite perk of this membership! Interested in saving EVEN MORE?! Sign up with my EBates link and receive $10. You literally get paid to shop! Stores give you cash back on purchases you make. You will literally get a check in the mail, or you can choose to get paid through PayPal! Sign up using the link below! Message me if you have any questions! Happy Cleaning & $hopping!
Love, Marie Everyone close to our family knows that this is our dream. Fetzer's Freakin Juice! We want to provide organic, cold-compressed juices to our community using locally sourced produce. We've been working on this dream for a few years now. I think we have the boost of confidence and support we need to finally get things rolling. The Ultimate DreamWe are looking to start a cold-compress juice company in our local area for the purpose of getting people of our community more involved with their health and wellness. We would seek local, organic produce whenever available. Cold-compress juicing is a two-part system that allows for maintaining the maximum retention of nutrients. The produce will never be chemically treated or heated. This will help to ensure the enzymes stay alive, giving you the freshest, healthiest juice available. One 16 ounce bottle of juice can contain around 7 pounds of produce. This is more produce than most people eat in an entire week! Since we care so much about the earth and our community, we want to maintain a zero-waste business. Our bottle would be made of glass. We would provide a rewards system for recycling the glass bottles back into the business to be reused. The used produce from the juice making process will be turned into compost that will be given to local community gardeners for free to promote organic gardening. It is our hope to provide the highest quality juice possible to our community, and one day, make it available to everyone. We understand that this may take a lot of work, and we may need to start small, but this is something that we are willing to work towards. We need YOUR help!You may be asking yourself how you could possibly help us with our project. We need to hear from YOU! Do you think this is something you and your family would be interested in? What questions do you have for us about our project? Please feel free to leave any comments, tips, and words of encouragement. We really want your feedback on this one! Take a moment to fill out the short survey below! Please share with others so we can spread the word and get as many opinions as possible! Thank You! M&M Fetzer The holidays can be a stressful time of year, but it doesn't have to be! I'm going to walk you through some amazing tips and tricks to save money this holiday season, and guess what?! You can also earn money back while you shop! If you are going to shop anyways, why not get the most out of your dollar, and why not get cash back when you can! Cha-Ching! We live in an age of technology. Unfortunately, not all of us can afford to buy our kids a $500 tablet. Imagine having to buy more than one, for many of us, this means breaking the bank! There are some pretty affordable tablets that are both kid and adult friendly. Here are the tablets we own. Want FREE 2 day shipping? Don't have Amazon Prime? Try it for FREE! When our iPad kicked the bucket, I couldn't afford to replace it with a new one. Fortunately, I discovered these Awesome Fire Tablets. They have this cool feature where I can change the setting on each individual profile so my kids aren't accidentally clicking on content that is not meant for their innocent eyes! My kids each have their own tablets. They come in many different colors, so no one gets confused about which tablet belongs to them. My two year old uses hers to match shapes and colors on her favorite game. My nine year old likes to play Minecraft games and Madden. I like to use the tablet to browse Pinterest for new projects and recipes. It's also great entertainment for long car rides. We download movies from Netflix right onto our device! It's nice to watch movies even when we don't have the option of having wifi available. For the capabilities and price, you can't beat it! Right now, you can earn cash back on your Amazon purchases! When you sign up for EBates you can earn cash back by shopping on Amazon. You will also earn $10 when you sign up through my link. I just ordered off of Amazon and earned 6% cash back on my purchase. Since I used my Amazon Prime credit card, I also earned 5% cash back! I love stacking discounts and rewards for optimum savings! One of my all-time favorite purchases has been my Echo Dot. While enjoying my morning coffee, I ask Alexa to give me news and weather updates. She also helps me keep track of the time while I'm cooking up a feast in the kitchen. I can use my voice to ask Alexa to set multiple timers for me. Having a hands-free timer in the kitchen is a huge help! Echo devices are more affordable than the competitor brands. Affordability is a huge factor for our family right now. My nine year old put this on his holiday wishlist. He likes to play trivia games with Alexa, listen to music, and he can set his own alarm for school with ease (he hasn't been able to figure out all the buttons on my standard, ten year old alarm clock). What gift would you get the busybody in your life? What about the gift of convenience! Imagine having your groceries delivered right to your doorstep! This is such an amazing gift! When I don't have time to stop at the grocery store, I can go online, pick the items I need, and pick the most convenient delivery time to meet my needs. Everything comes packaged in these really nice insulated totes. The cold items are packed with dry ice, so they stay fresh and cold. You can set the totes outside to be picked up and they will reuse them! No more wasteful plastic grocery bags! This gift is great for a college student, busy mom/dad, or a grandparent who shouldn't have to go out in the cold to get groceries! Imagine giving someone you love the gift of security. Home security systems can get pricey with their monthly fees. Imagine paying one price for home security and being able to protect your family and your home at no additional cost. Well, let me tell you, it's possible! I was fortunate enough to receive a SmartCam as a gift, and it is one of the most useful gifts I have ever been blessed with! I used it when my daughter was born to monitor her while we were in the other room. I could watch her from any device. I would get alerts right to my phone when there was any movement. I could play a lullaby with the press of a button, and I did not have to risk disturbing her. You can connect multiple cameras to your SmartCam app and get alerts when you are away from home. I set up motion sensor areas on my doors and windows, so I can get alerted when someone walks through the door. Luckily, no one has ever tried to break in my home, but my dog usually sets off the motion detection when she is sitting at the window, barking a squirrels. I can use the microphone through my SmartCam app to talk to my dog and calm her down! How cool is that! Check out the video in the link above to see all the features that this product has to offer! Give the techie in your life a gift they are sure to love without going broke! This is the best time of year to go shopping! There are so many deals, and all of your favorite stores are competing with each other to get you the best possible price. Why not take advantage and combine these deals with your EBates cash back program, and literally get paid to shop! EBates will periodically send you a check! It's such a nice surprise to open the mailbox and receive a check for shopping! Again, don't forget to use my link to earn $10 for signing up! There are so many store doubling their cash back right now! Some stores are giving up to 20% cash back! Plus, you can find all the promo codes associated with your favorite stores without searching through a million different sites! WOAH!!!! Before I go, I want to give you a quick rundown on how I used EBates to buy my son new pants that he desperately needed! I had Matt sign up and he got Jontai pants off of the old navy website after I saw on EBates that there was a 50% off jean sale, plus an additional 20% off sale on the entire site, plus free shipping. My bill was $130- after discounts it was $60! Then I got $25 for him signing up and he got $10 plus he will get cash back! So essentially I spent less than $25!!!! Happy Shopping, Marie
P.S. Please share any amazing deals you have found! 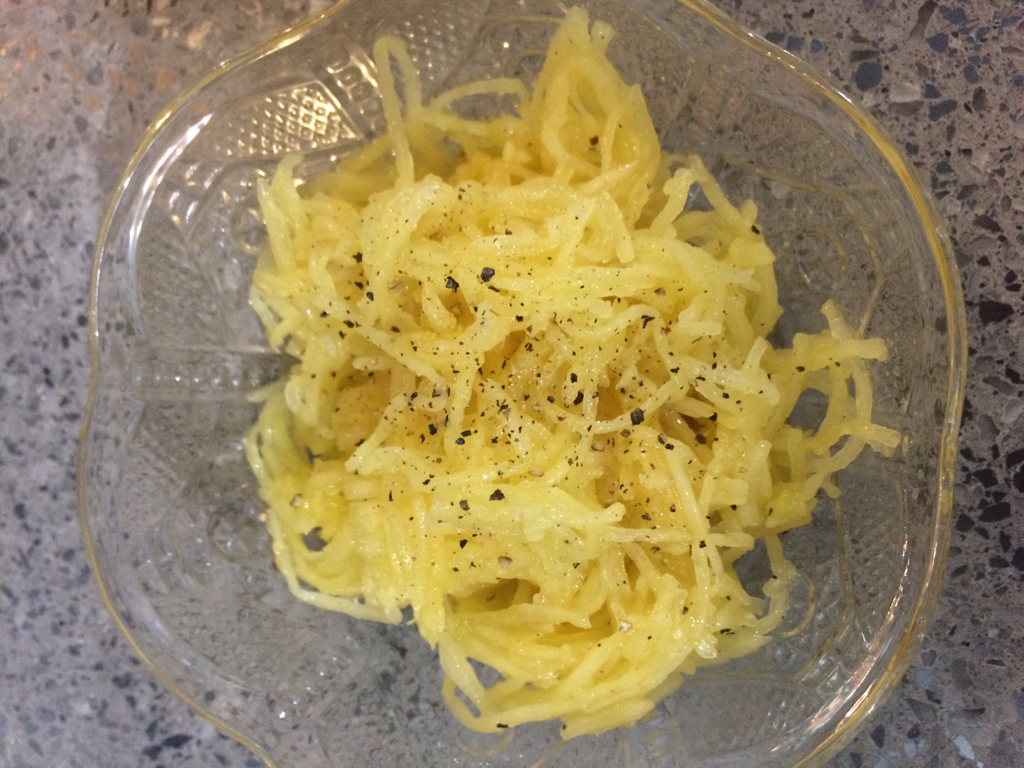 Everyone is always telling me I need to try spaghetti squash. I finally bought one for super cheap. After I brought it home, it sat in my counter for a few days. I was clueless. Like, what the hell do I do now? I asked around. I got a few different opinions from others on how to go about cooking this thing. I checked a few YouTube videos out. I even got on Pinterest. After all my research, I finally decided my best course of action. Scrap all those ideas and figure out my own way. I'm stubborn like that. I get it from my mother. Some might call it lazy, but I just like to work smart, not hard. As it so happens, I was roasting my ingredients for my Tomato Squash Soup. (https://crunchymomsrule.weebly.com/blog/roasted-tomato-and-squash-summer-soup) I figured I might as well save energy and roast this thing in the oven too. I cut the squash in half, scraped out the seeds, filled a glass baking dish with an inch of water, and placed the squash in the dish cut side down (this method I witnessed on YouTube, but I couldn't remember the cook times and temperature). I put it in a 325° oven for two hours. I figured since I was roasting the other squash for two hours, it wouldn't hurt anything. This is my universal vegetable roasting method. You might as well roast those squash seeds while you're trying to save time and energy! I set a separate timer for the seeds. I keep an echo dot in my kitchen to help me when I'm cooking! Alexa has saved me from burning many meals! Check her out! 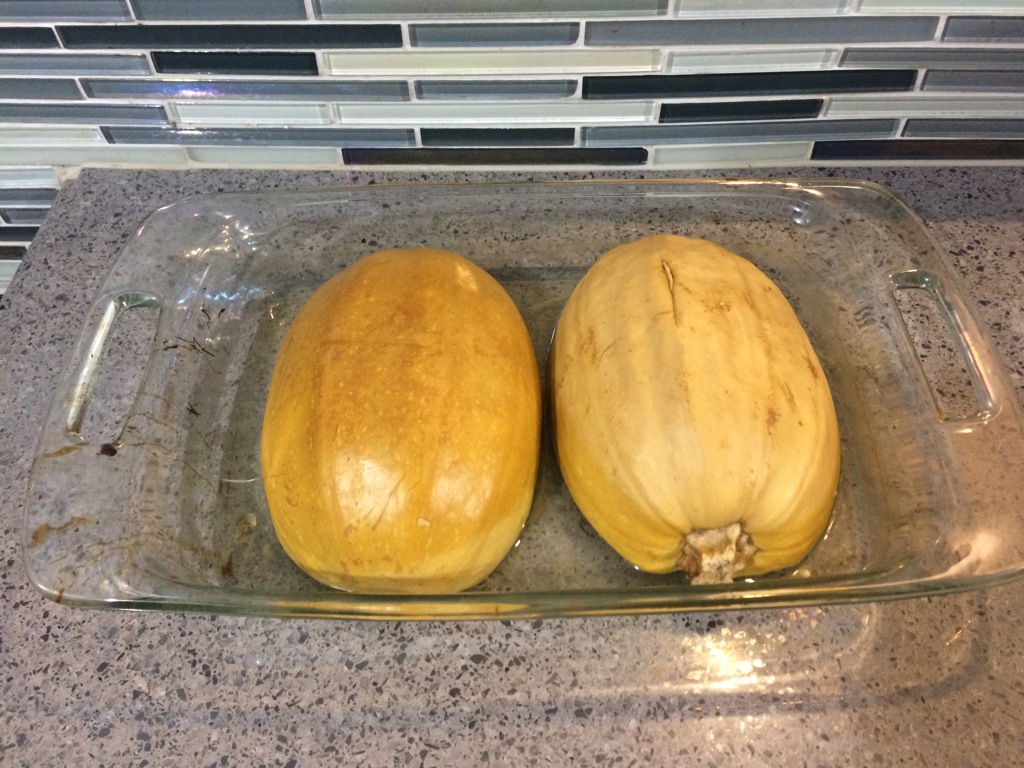 I opened the oven and let my squash cool down. When it was cool enough to handle, I flipped it over and forked it. I can't believe it actually looks like spaghetti noodles. I am impressed! 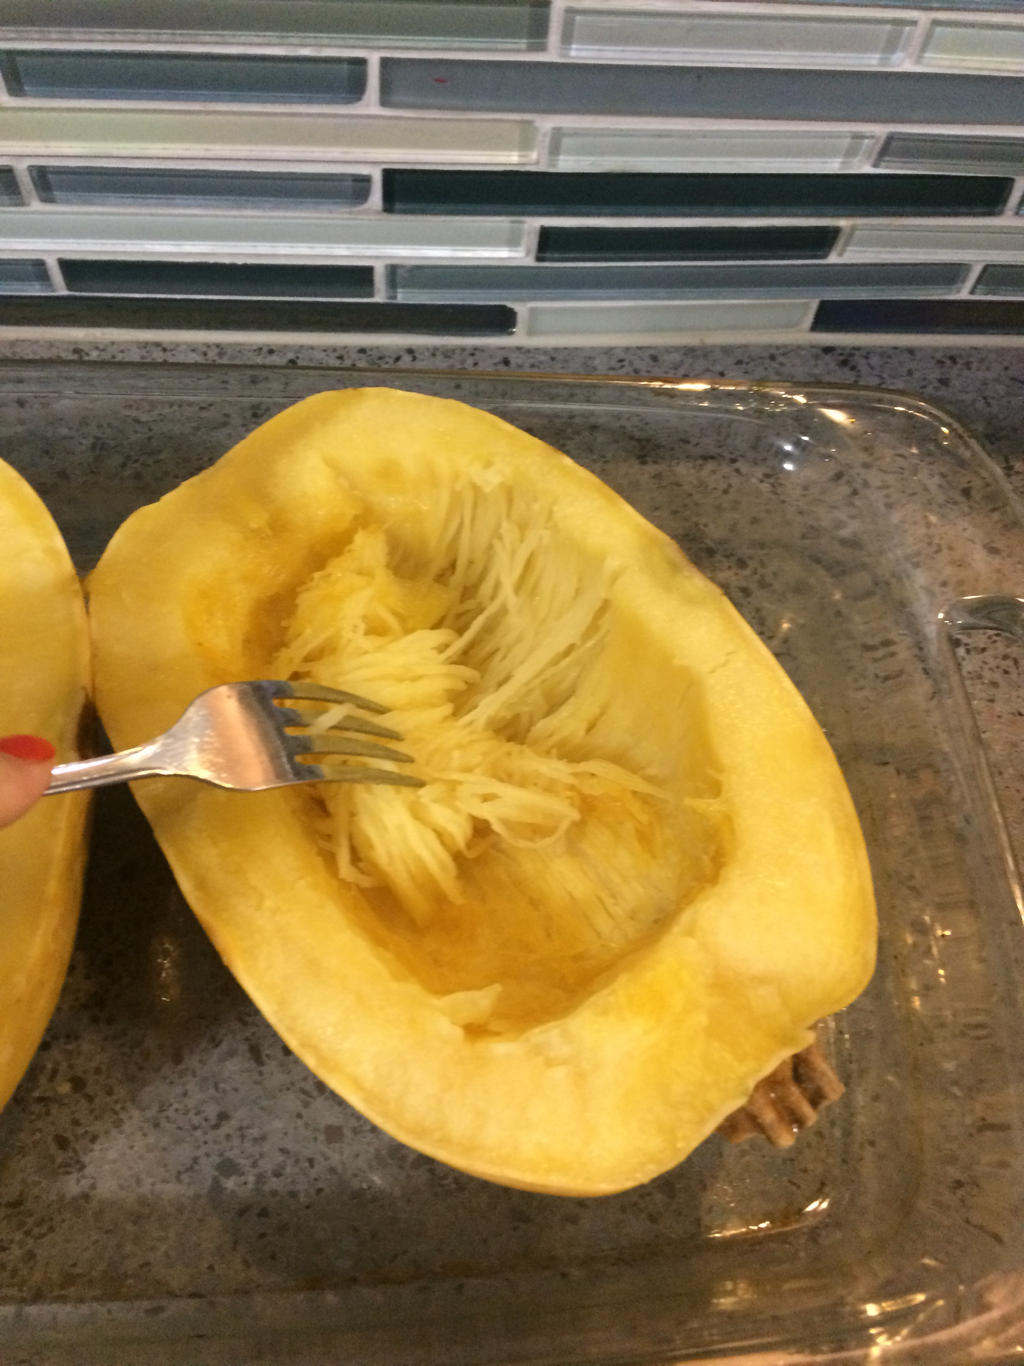  I really didn't want to take away from the squash's own natural flavor. It's very light and not overpowering at all. The texture surprised me because it was still pretty firm after roasting for two hours. I was sure it would turn to mush. The strands were perfect little noodles! I drizzed some some of my homemade garlic oil on top of it and seasoned with salt and pepper. It was delish. My daughter tried it and liked it. Mom win! Tomorrow we will have it for lunch with some my Tomato Squash Soup doubling as a marinara sauce for the noodles! Here's the link for my garlic oil recipe. Since I'm obviously new to the world of spaghetti squash, please share with me your favorite ways to eat it! Bon apetite, Marie  I love finding trash on the side of the road. I have no shame. I feel so good about being able to take something that would have otherwise been sent to rot in a landfill and turn it into something beautiful and useful. We live in a world where waste is a normal, every day thing. I'm always looking for ways to reuse or repurpose trash. Imagine the joy I felt when my neighbors set this bi-fold shutter out for the trash man. Sorry Mister Trash Man, not today! My step-father used to haul away trash, and always brought home cool stuff, so I think that's why I'm not weirded out about getting my hands dirty. You would be amazed by the things people just throw away. A few weeks ago, I got a solid, cherry wood, antique bedroom set. Best part?! I got it FO FREE! I have a two-story, four-bay garage. I could honestly furnish a small house with my beautiful trash. Almost everything in my house came second-hand or was found along side the road. No shame in my game at all! Sorry about the rant, here are the shutters! 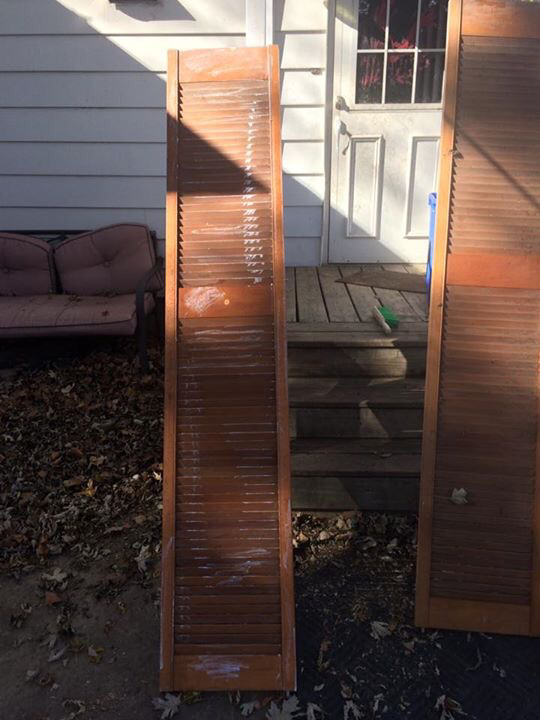 First, I wiped them clean, then I took a bar of soap and rubbed it along random spots all over the shutters (notice the white marks on the left shutter). Next, I applied my paint. I had a paint sample from Home Depot that I found in my bathroom when we moved in our house, so yay for more free stuff! This paint was meant for interior walls, but it worked perfectly for this project. 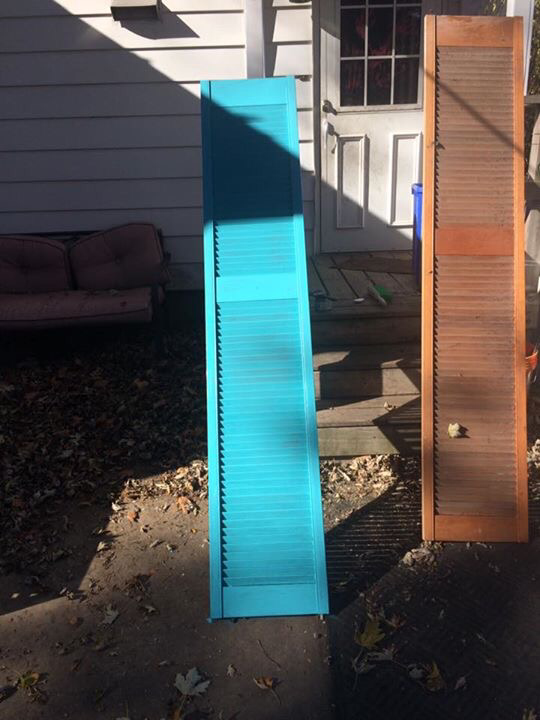 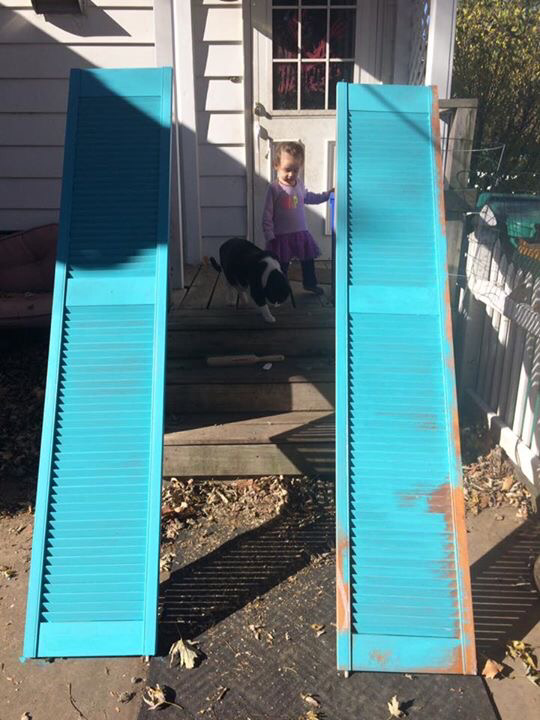 Allow the paint to fully dry. I would suggest giving it a full day. If you are stubborn like me, you'll only give it a few hours! Once the paint is dry, take an old rag and rub the paint in the areas where the soap was applied. The paint will rub right off, leaving a beautiful distressed look. To further distress the wood, I took a wire brush to a few random corners and surfaces. 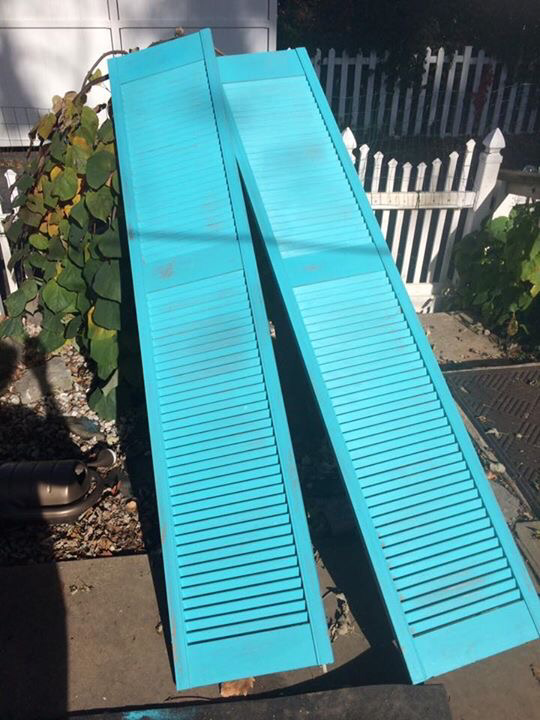 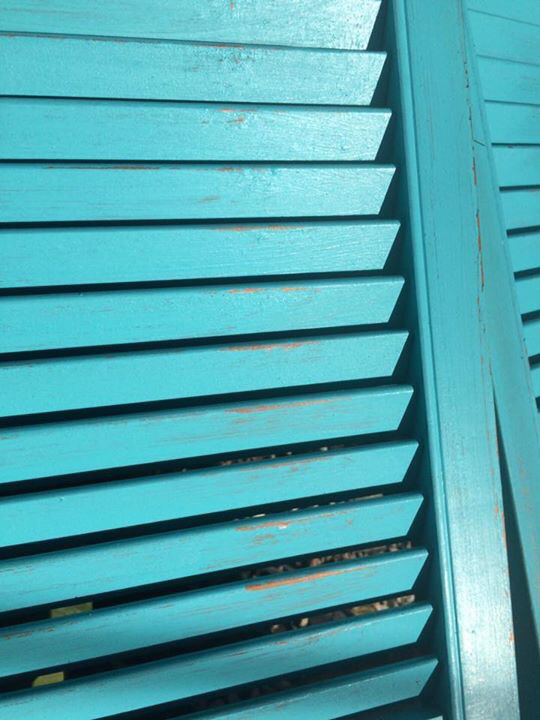 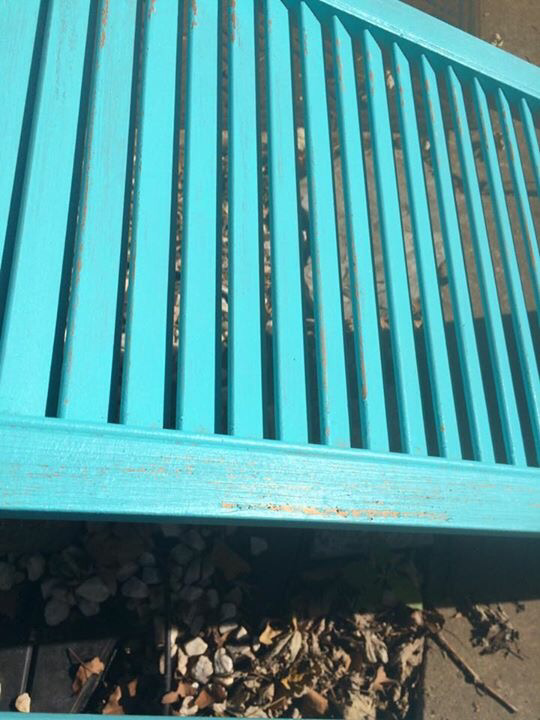  How awesome does that look! Are you keeping tabs on the cost of this project? Yep, still at $0! Next, I added a few cabinet knobs that came off of my bathroom cabinets. I found a towel hook that I purchased in the past, but never ended up using. It was a perfect addition to this piece. Technically, I already had all of the supplies for this project, but since the towel hook was still brand new, we will just say that this project cost a grand total of $3 from start to finish. Add a few clothespins, and voila, masterpiece! Are you ready for the big reveal?! Here goes nothing! 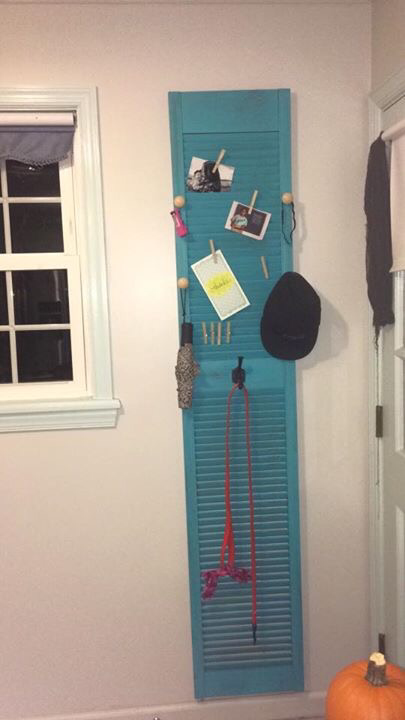 Isn't it the cutest?! The other shutter is going to be a shelf, I just haven't had a chance to hang it, but as soon as I do, I'll be sure to post a photograph. Have you turned trash into treasure? Please share it with me, I would love to see it! Love Always, Marie If you take away nothing else from this article, just remember, what you are doing for your child is wonderful. You are an amazing parent. There are so many challenges that come along with breastfeeding. As parents, all we want is what is best for our child. For some reason, other people feel the need to let you know what they think or what they would do if they were in your shoes. Well, guess what... they aren't in your shoes, and they never will be. The only opinion you should be concerned about is your own. We live in a time where everyone knows what's best for you, and they aren't afraid to shame anyone who doesn't hold the same thoughts or beliefs as their own. Well, you know what I say to these people, right?! ...I'm sure you're thinking what I'm thinking! My first child, my beautiful baby boy, Jontai, he was breastfed until he was six months old. I didn't know much about breastfeeding, but I heard somewhere that a child was less likely to get sick often if they are breastfed for a least the first two weeks of life. This was my goal, get to two weeks, and see what happens after that. Once I understood the true benefits, I wanted to continue to breastfeed for as long as possible. Jontai's father (for reasons I will never truly understand) took him from me for an entire month, so our beautiful breastfeeding journey ended very abruptly and very traumatically for both of us. We went from exclusively breast feeding to stopping cold turkey. My hormones went crazy. My body and my heart wanted my baby. I cried for a month straight and I couldn't eat. I was a whirlwind of emotions. I ended up losing 15 pounds from all the stress. When I was finally reunited with my baby, he had been taking formula, so I just continued with that and tried to make life seem as normal as possible for him. I wish I would have had the opportunity to continue to breastfeed him longer, but these unforeseen circumstances occurred, and we can't always be in control of every situation. I was worried that our bond would be broken. I guess I worried for nothing. My beautiful baby boy is now nine years old and he loves me more than I could ever deserve to be loved. He probably loves me just as much as he would have if he were exclusively bottle fed. He makes my heart so happy. I was a young mother, and looking back, I was very naive. I didn't think much for myself. I wasn't as health conscious as I am now, but I'm at least proud of my choice to breastfeed my son. Fast forward a few more years...about seven, my rainbow baby was born, Thailee Mae. I was so excited to get the chance to nurse another baby. My daughter was having trouble latching, but I wanted her to get the precious colostrum in her body. Nursing with her was very painful. Excruciating. I used so much nipple cream. Ice packs weren't helping either. I was determined not to give up. When we we went home from the hospital, I was in so much pain from nursing. My nipples were blistering. A friend gave me a nipple shield, and I tell you what, Thailee Mae was chugging away, and my nipples were able to heal. It turns out, Thailee had a lip tie, so it was affecting her latch. She could not latch onto my breasts while they were so full. I used the nipple shield for a few minutes, and then let her finish eating without it. This thing was a lifesaver. Many people frown upon its use, but for us, it worked. Unfortunately, no matter what kind of bottle we used, she could not latch onto it. That nipple shield was my best friend for almost her entire first year of life. Thailee saw a specialist for her lip tie, it turns out, the doctor refused to operate on her because her lip tie was so thick that he would have to put her under anesthesia to take care of it, and she was far too young to take the risk that comes with anesthesia. The solution: I quit my job and became a stay at home boob for this child of mine. Here we are, two years and two months later, and she's still sucking the life out of me. I've made a few attempts to cut back feedings. Once, we went a full 48 hours without breastfeeding. I eventually gave in to the shrieking/hyperventilating cries. I try to limit feedings to bedtimes, but I have no spine, and my child runs my life, and gets whatever she wants. Kidding. Not really though. Today, Thai breastfed in the morning after she crawled in bed with us. I was hoping she would go back to sleep. Nope. Throughout the day she asked for "boobie," but I offered juice instead. It seemed to distract her. While watching the season finale of Stranger Things, I gave in so she would stop yelling at me. Then, at bedtime, I told her my boobies hurt when she asked for it, and I gave her some juice and rocked her until she fell asleep. Some days aren't so easy. There are days when she will bawl around and throw herself on the ground and you would think the world is going to end. We can be standing in a crowded room and it will seem like every one else is silent, but my daughter is screaming, "I want a boobie! I want a boobie! Mommy, please!" Ugh. Then all the people in the room feel like they need to chime in to "help" me, or they just want to tell me their opinions about my daughter being too old to breastfeed...even worse, they tell my daughter in baby voices that she doesn't need a boobie. When I started this journey, I always said Thailee would wean herself. I just thought it would be a little easier than this. If it were up to me, I would have been done breastfeeding a long time ago. It's not up to me though; this is an "us" type of relationship. We BOTH need to be ready. The thing that keeps me going strong is knowing that it's good for her, and sometimes it's her only means of comfort. She rarely gets sick, and she's a super baby genius. I like to attribute that to great genes and breast milk. I honestly think that the hardest part for me is the shaming I receive from other parents. People are shocked when they learn I still breastfeed. They give me weird looks, make rude comments, or literally just stare at me the entire time I am trying to privately nurse. I've literally had a husband and wife watch me. I tried to turn my body away from them, they made me feel so uncomfortable. I'm pretty quiet about it while it's happening. People rarely know that it's going on. This is just my own personal preference, although Thailee may have other plans. They are, after all, her boobs, not mine. I get asked the dumbest questions, like "doesn't that hurt now that she has teeth." Well Nancy, I don't just let her chew my nipples off. Besides, I doubt my daughter wants to bite off her own tongue while she's eating to gnaw on my nips. Not every day is sunshine and rainbows. Sometimes I am literally in tears. Sometimes I am exhausted from it. Sometimes I cry myself to sleep. I may even cry when I wake up in the middle of the night to stumble down the hallway to comfort my child. Sometimes I feel like I'm going to lose my shit. Sometimes I feel like my nipples are hanging on by a thread. It's a roller coaster of emotions for us. These are the times that I reach out to my fellow breastfeeding mamas. You would be surprised how many support groups that there are! There are so many other moms out there just like me, on the verge of losing their shit-how cool! It's nice to feel "normal" once in a while! It's refreshing to be able to feed my daughter around friends and family and no one bats an eye, and I'm not defending my choice to breastfeed. Listen, we get it, we know how old our children are, we don't need others to remind us. I don't question other parents when I see them feeding their kid garbage, please, don't question me giving my child the most natural kind of nutrition available to her. I understand that not everyone breastfeeds their child for as long as I have, but just let us do our thing in peace. We will stop when we are ready. Your input will literally have no effect on this timeline. I'm just always going to be annoyed by you now. Please don't ruin my positive experience and try to turn it into a negative one just because it is different from your norm. Here's to 2 years and 2 months of breastfeeding, I'll be sure to keep you updated on our progress, or whatever. End Rant. Stay strong moms, Marie. For now, I'll enjoy these cuddles.  Contrary to what many people believe, you do not have to break the bank in order to eat a healthy, plant-based diet. It's all a matter of buying produce that is on sale and/or in season. Since I am staying home with our youngest child, and my husband is the only one working at the moment, we are forced to be mindful of our spending. We spend less on groceries, but even though we cut corners on cost, we do not cut corners on nutrition. We are firm believers in eating for health. I feel that if you have a poor diet, it shows in your energy levels or in your overall health. I'm happy to say that it is very rare that anyone gets sick in our house. **Knock on wood! I can count on one hand how many times someone got sick in our house, and we are a family of four! Anyways, when we are being frugal and mindful of what goes into the shopping cart, I create meals that can overlap each other. We do a lot of burritos, pasta and rice dishes, as well as soups. For example, if we make burritos one day, the next day, some of the leftover veggies can be used for a chili or vegetable soup. If I make my homemade Tomato Squash Soup, the next day, the soup will be turned into a pasta sauce. You can find that recipe below: Are you ready to see what today's grocery store haul brought us? Of course, I went to my favorite store Aldi! No, they don't pay me or give me any discounts for promoting them (although, I wouldn't object to it!). I just love their amazing prices. They beat out pretty much any major chain store around. This is the only place I shop. Well, I lied, my meat-eating husband is very particular about his lunch meat. He likes it cut fresh from the deli. If only Aldi had a deli....a girl can dream, right?! Okay, finally, the reveal! Here is my grocery haul for the week for my family of four:  Understand that our pantry isn't empty, we keep pasta on hand for when I don't have time to make it fresh, we also keep rice and farro in the pantry for quick and easy stir-fry or fried rice dishes. Well, guess what I spent. Guess! I spent $45.91! I have posted me receipt below just in case no one believes me. As you can see, I have two receipts. Mom brain caused me to forget the coffee as I'm running through the store, holding my sleeping 26.5 pound toddler in my arms, and trying to grocery shop. How I could forget this life saving, magical, ground up bean in a can is beyond me! If if I were to buy all these same groceries at another store, it would have cost me around $80-$100. Ridiculous, right? Under $10 for two large cans of coffee?!?! I used to pay $12.99/lb for our favorite coffee. Guess what, no one even knew the difference after I made the switch! When we have house guests, I'm always asked what kind of coffee I use. We get a lot of shocked faces when I tell them it's some cheap, small-named brand of coffee! 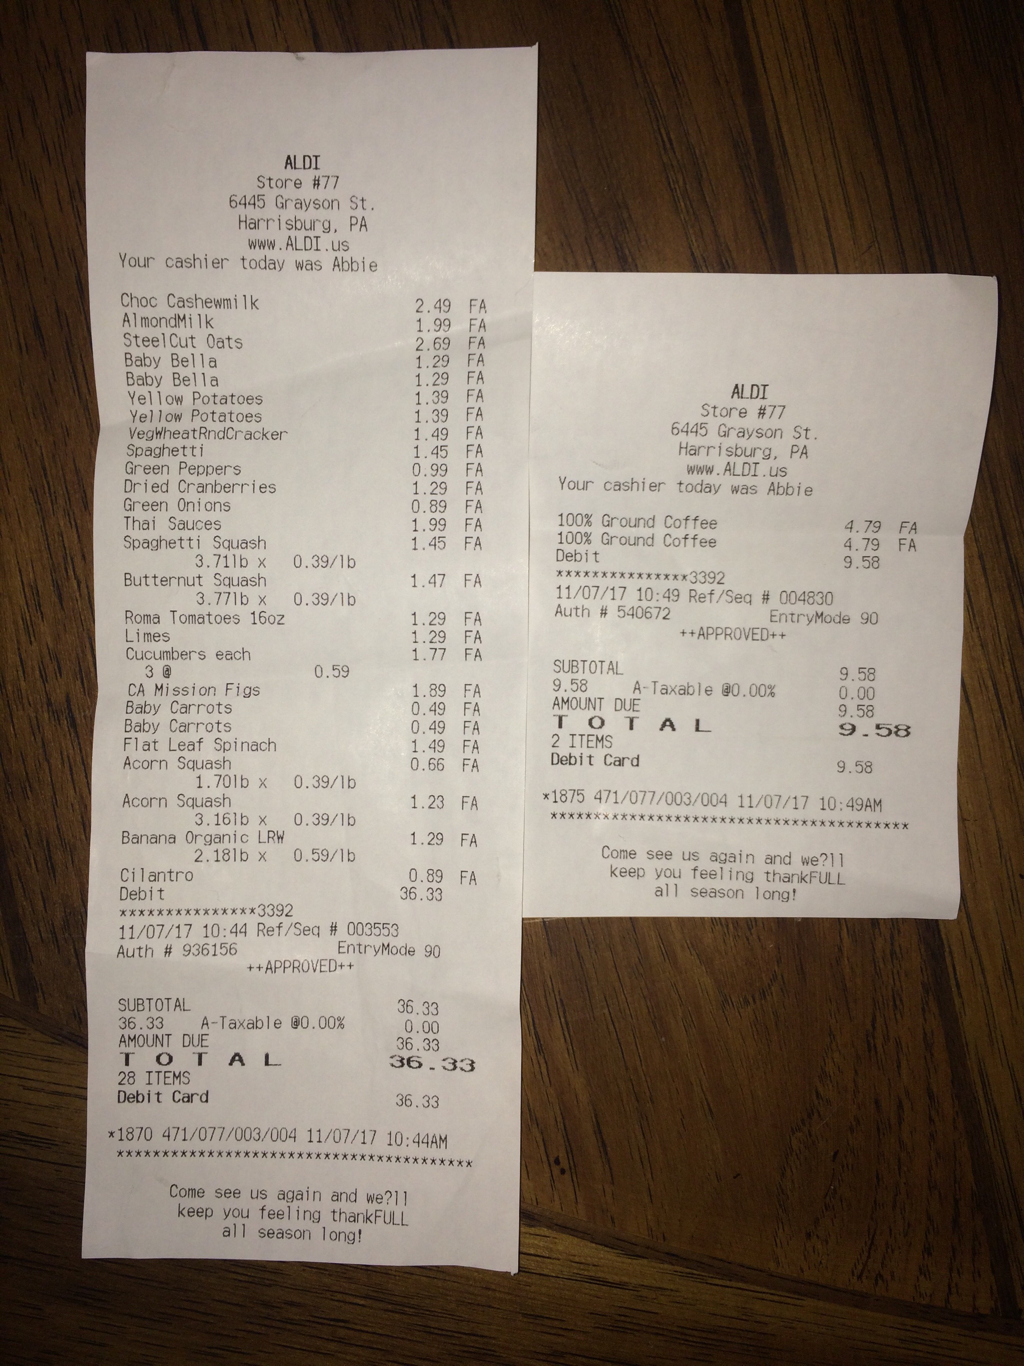 If you are one of those people who think it's expensive to eat healthy, I challenge you to give it a try. Seriously, I will help you! Just send me a message on one of my social media accounts. I would be more than happy to share my knowledge!
With Love, Marie #mamamarieskitchen 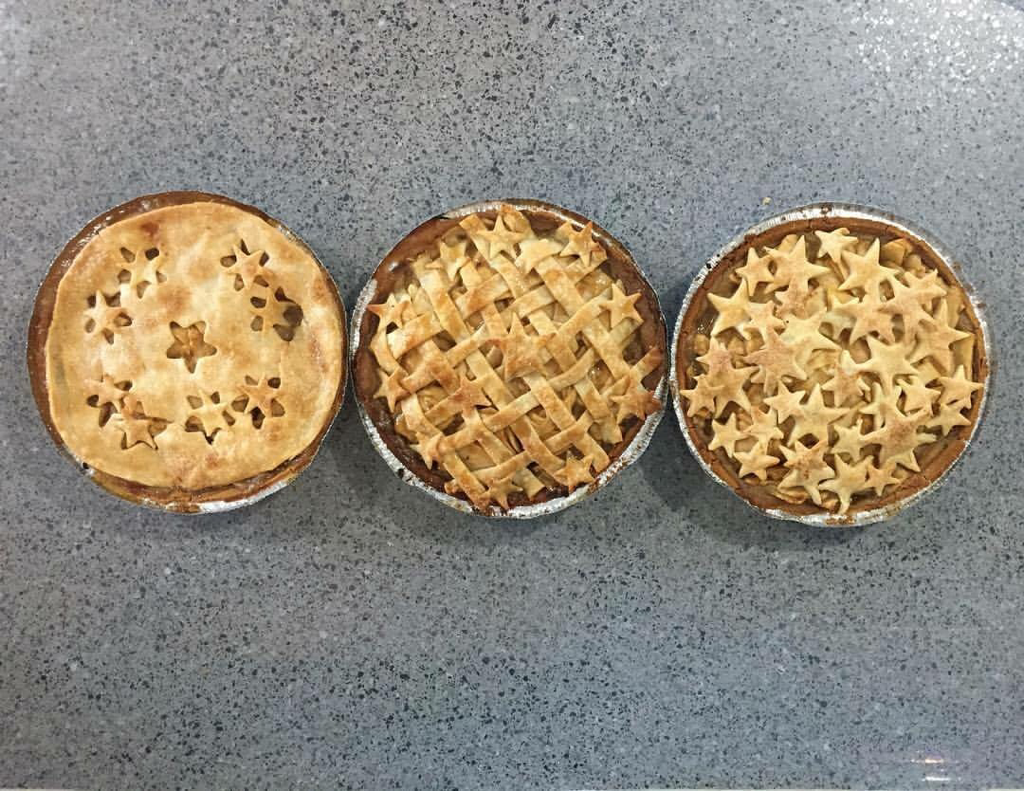 Today is a special day for us! My amazing husband and I are celebrating our 4th wedding Anniversary! The last four years have been pure chaos! We bought a house, had a baby, adopted a few animals, currently our son's peewee football team is undefeated and going to the Super Bowl, GO HERSHEY TROJANS, and the list goes on! One way to my husband's heart is to dangle a freshly baked apple pie before his eyes! I know now what you're thinking, why not just go and buy a frozen pie and throw it in the oven and be done with it. Let me tell yah, nothing quite compares to a fresh, homemade pie! I hope you enjoy it too! It's super easy to make this homemade pie filling! Firstly, you want to peel, core, and slice your apples. I use my food processor to slice up the apples. I use the slicing blade, and the apples are perfectly sliced every time. The best part, I can slice 6-8 apples in about 30 seconds! Here's what I use: Next, we prepare the sauce. This is my very own recipe. I am constantly forgetting to write down new recipes, luckily, this one is so easy to remember (and I'm documenting it here in case I forget). I also wanted something that uses less sugar than most of the other recipes I've found online. Here is what I came up with. In a medium saucepan, melt 1/4 stick of your favorite butter (vegan butter friendly :) on medium heat. Once melted, add in 1/4 cup of brown sugar, 1/4 of white sugar (I use raw, pure cane sugar, so it's not actually white, but you get my point! I have replaced the white sugar with xylitol, and it works perfectly fine. http://amzn.to/2jg0FAG Add in 1/4 cup of your favorite apple juice. Throw in some salt. Just a pinch. I also added 1 tablespoon of cream of tartar. Last but not least, a few dashes of apple pie spice seasoning. This truly sets it off! Here's the brand I use: Constantly stir the mixture, you don't want it to burn. I whisk it the entire time. Once it starts bubbling constantly for about 20-30 seconds, remove it from heat and let it cool while you prepare your pie crust (I'm usually too busy, so I cheat and use store-bought...kill me). My favorite brand is whatever Aldi keeps in stock because it's cheap and easy (just how I like it). Okay, now we combine the apple slices, 5-6 cups, into a bowl add mix in our sauce. Add your pie filling to the crust in your pie pan. My favorite thing to do next is to cut out cute shapes abs arrange them on my pie to make it look super fancy. As it is our anniversary, I went with heart shapes. 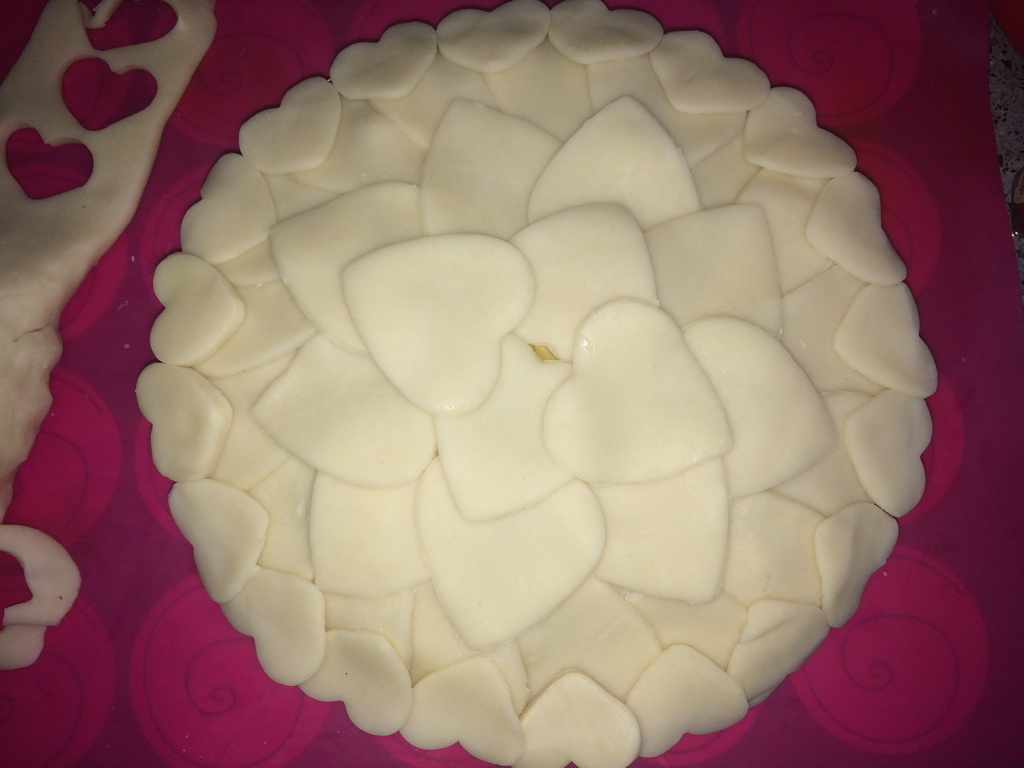 Cute Right? You can find them here: To get the pie filling to be perfectly cooked and make sure that the crust doesn't get too dark, I bake it at 400° for 10 minutes then lower the temperature to 350° for an additional 45 minutes. How amazing she's this look?!?!  YOU GUYS! Before I forget, do you remember that baking mat I used to roast veggies in for my Tomato-Squash Summer Soup Recipe? (in case you need to jog your memory: https://crunchymomsrule.weebly.com/blog/roasted-tomato-and-squash-summer-soup). I used the same baking mat to cut out my perfect heart shapes on! It's a lot better than using a hard surface, because the little cookie cutters can get all the way through the crust without leaving anything still attached to the rest of the dough. I also used the same mat to bake my pie on to keep the cleanup easy! 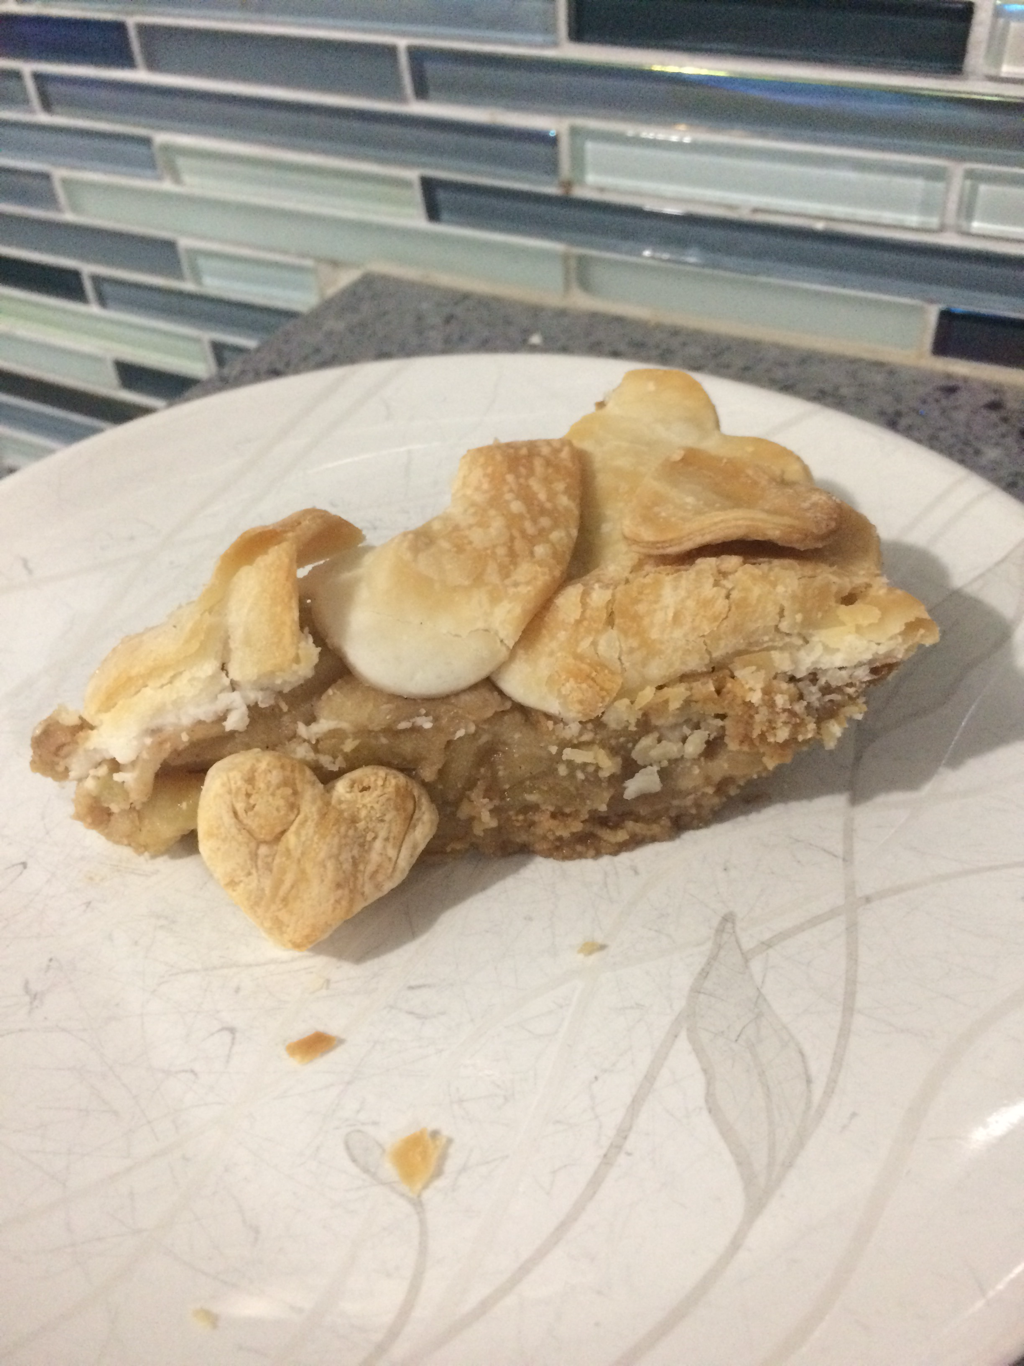 Okay. Let's recap. Caramel Apple Pie Filling Ingredients1/4 C butta 1/4 C brown sugar 1/4 C white sugar 1/4 C apple juice 1 tbsp cream of tartar pinch of salt few shakes of apple pie spice Heat together in sauce pan over medium heat, whisking constantly. Add to sliced apples and voila! Fill your pie crust with mixture and bake at 400° for 10 minutes then bake at 350° for an additional 45 minutes. Serve warm with ice cream or eat it cold, either way, it's AMAZING! ENJOY! Love, Marie #mamamarieskitchen
Today is so bittersweet. It has been cold and wet and miserable all day long. I didn't see the sun at all, so naturally, my winter depression is starting to kick in early this year. I found some acorn squash and butternut squash for 39¢ a pound at my favorite store ever, you guessed it, Aldi! I started preparing my ingredients to make squash soup, and when I walked outside to pick my fresh rosemary, thyme, and sage, I found some ripe tomatoes on the vines! I filled the pockets of my cardigan, but there were so many I have to pull up my shirt and pile the rest in a makeshift type basket. It's seriously the most exciting thing to happen to me all day. I didn't expect to get any more tomatoes this year. My heart is so happy. Anyways, this is the story of how my squash soup turned into a tomato-squash soup! It's so easy and delicious! I have already eaten an entire quart to myself, and I feel no shame! Are you ready for this deliciousness?! Okay, here goes! First, halve your squash and scoop out the seeds. You will also want to peel and halve an onion and 3-4 garlic cloves. Now for my secret ingredient.... two of your favorite apples! Cut them in half and take out the seeds. This adds the perfect amount of sweetness to the dish while helping to savor the wonderful taste of summer! Assemble the ingredients on a pan. I tried out my silicone baking mat for the first time. It was perfect for this. My only wish is that I owned more than one! Put everything skin side down on the pan, brush with your favorite oil, and season with salt and pepper. I used my homemade garlic oil because it's so fragrant, and I absolutely love garlic! If you want to make your own, here's a link to a video tutorial. It's so easy!!! youtu.be/g0SahBUMzBE 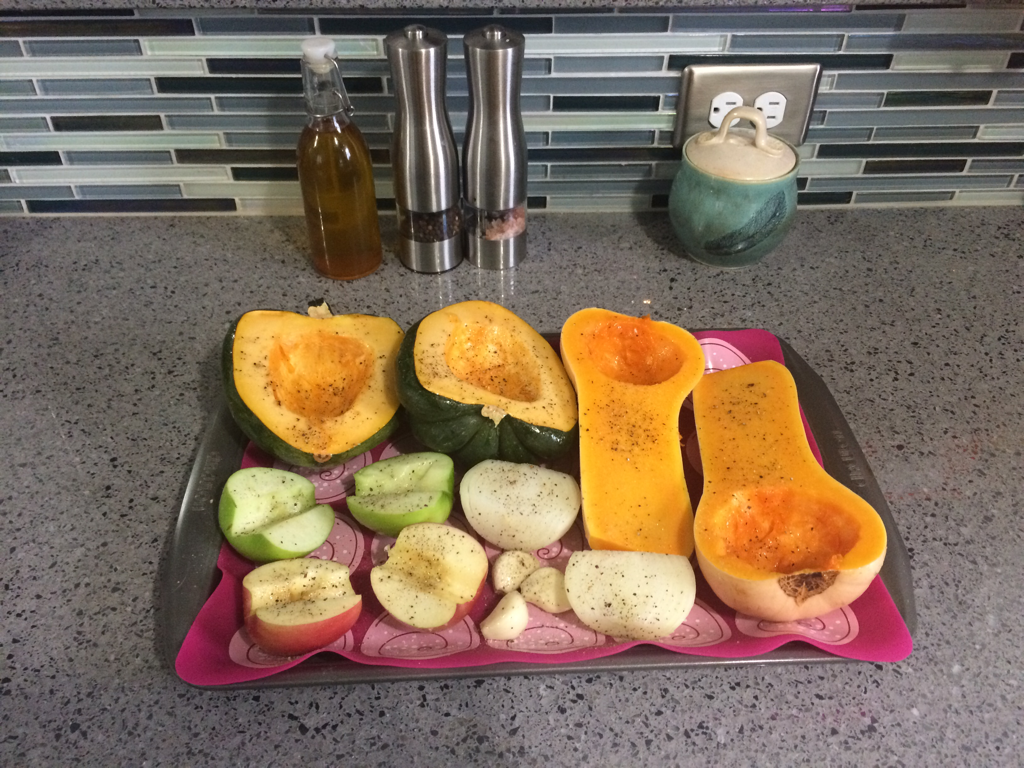 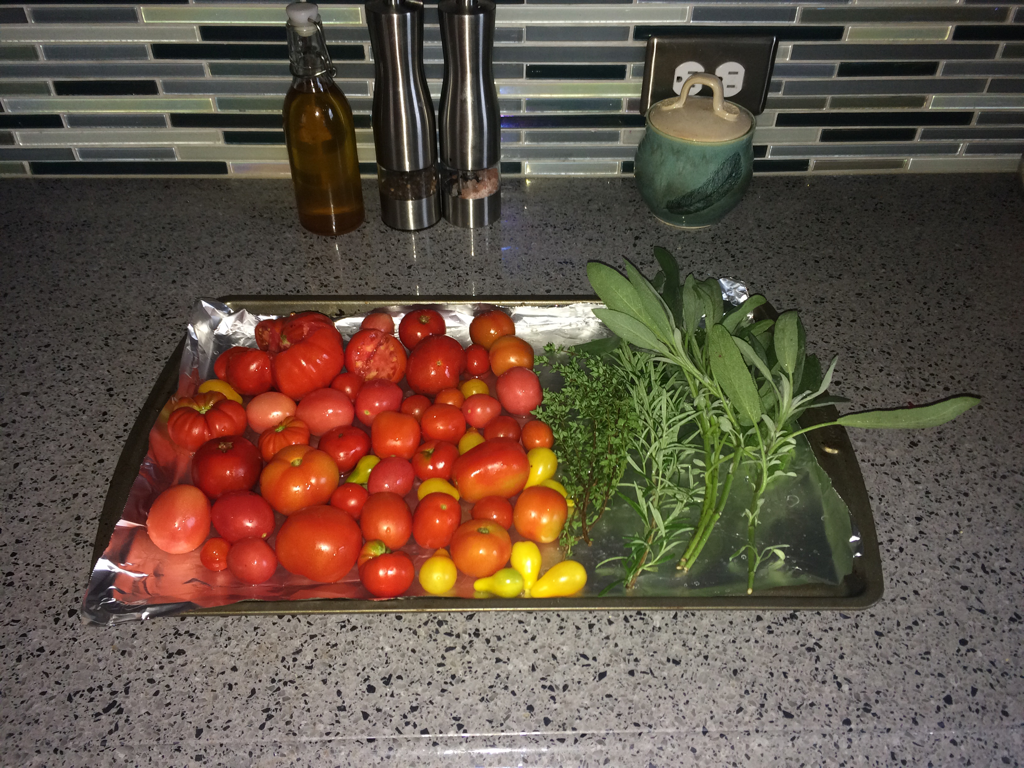 Once everything is assembled and ready to go, put it in a 325° oven for 2 hours. While that is in the oven, prepare your tomatoes and herbs. Place them on a baking sheet brushed with oil and add to the oven when there is one hour remaining. Roasted vegetables really bring out the best possible flavor in this dish. All of your senses will be pleased! Let me just warn you, your house (and your neighborhood) are about to smell amazing! 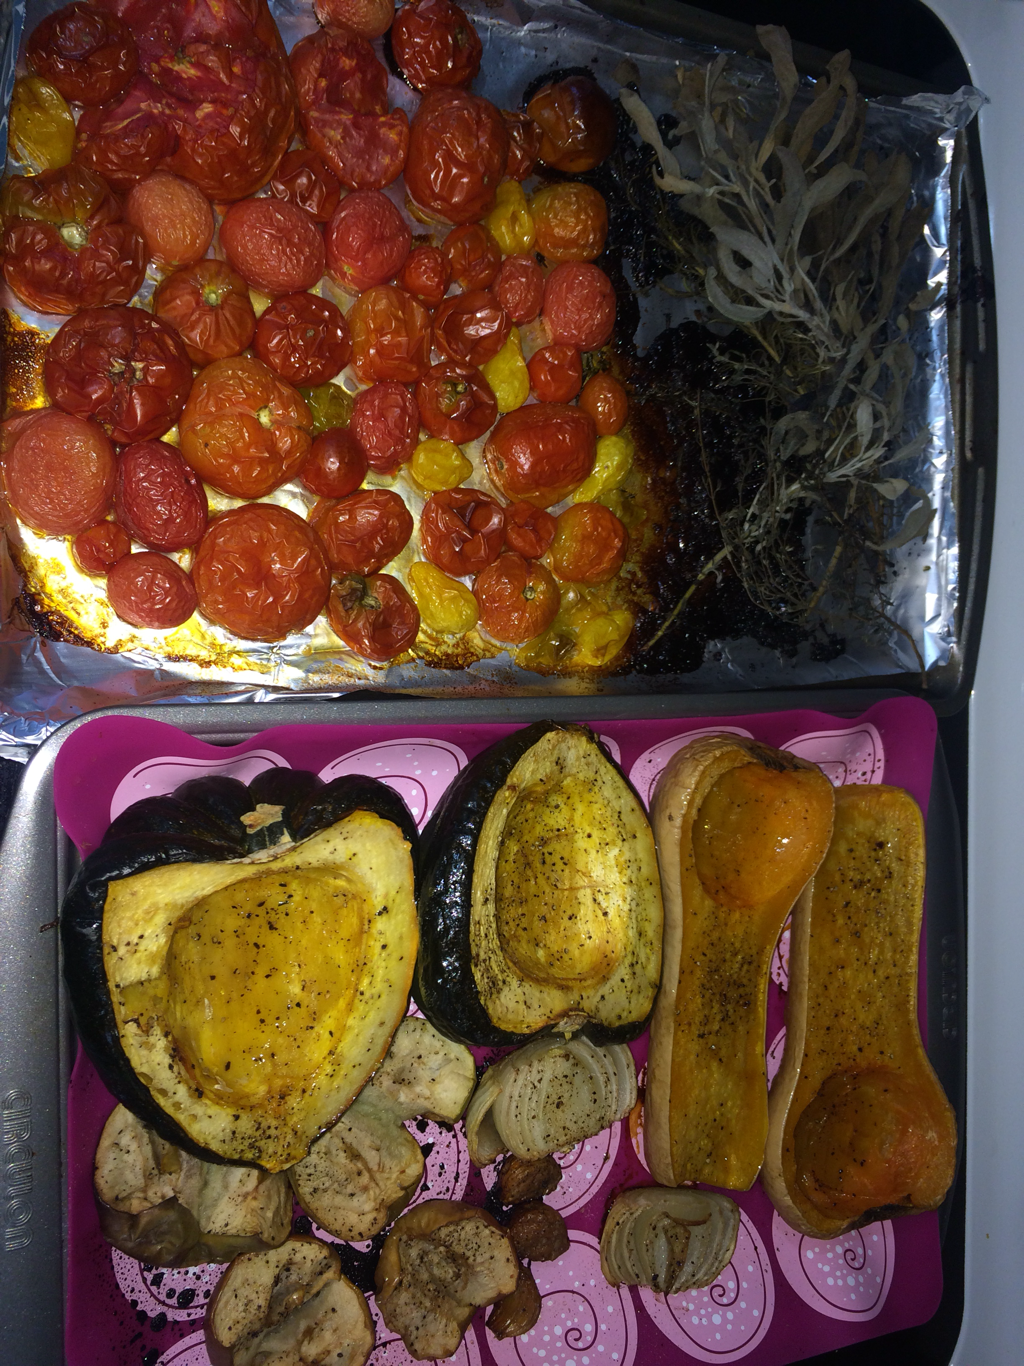 Remember that baking mat I mentioned earlier? Well, the veggies that roasted on it for two hours did not even stick to the mat! I plan on purchasing another, and I will never buy aluminum foil or parchment paper ever again! I'm seriously in shock by the easy cleanup! The tomatoes and herbs that were only roasting for an hour had to be scraped off of the foil lined pan, and some of the juices escaped the pan. Never again! Here is a link where you can purchase a baking mat similar to the one I am using. Okay, so the next step is to let everything cool completely. Once it is cool, scoop out the flesh from the squash and the apple, leaving behind only the skins to discard. For the herbs, you will want to separate the stems and discard them. Put everything into a blender or food processor. Let it run until smoothe. At this stage, it will look like baby food. Put everything into a large pan and add two cups of vegetable stock. I made mine ahead and freeze it for when I need it. I'll be sure to provide you with that recipe in the near future. Heat everything on a medium heat until it is hot all the way through. Season to taste with salt and pepper. Add 1/4 teaspoon off Chinese Five Spice. If you don't have any, you can purchase it here: I would suggest serving this in a soup cup to help keep those hands extra warm on a cold winter day! Bread is also a great edition! ENJOY! 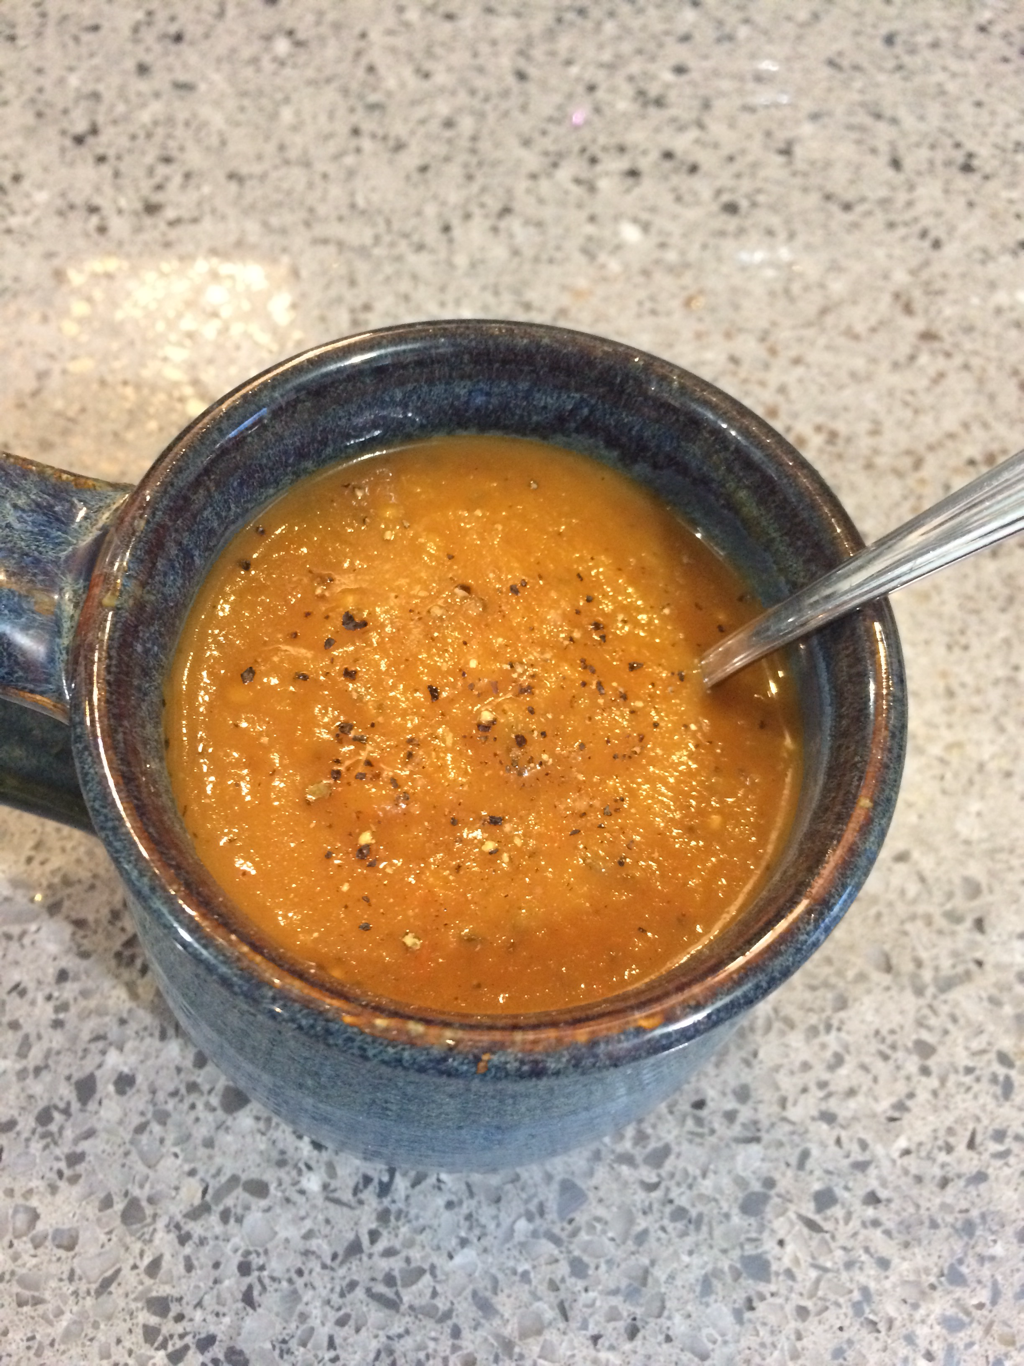
|
Archives |
 RSS Feed
